MicroPython
Python for micro-controllers.
Contents
What is MicroPython?
 micropython.org
“MicroPython is a lean and efficient implementation of the Python 3 programming language that includes a small subset of the Python standard library and is optimised to run on microcontrollers and in constrained environments.”
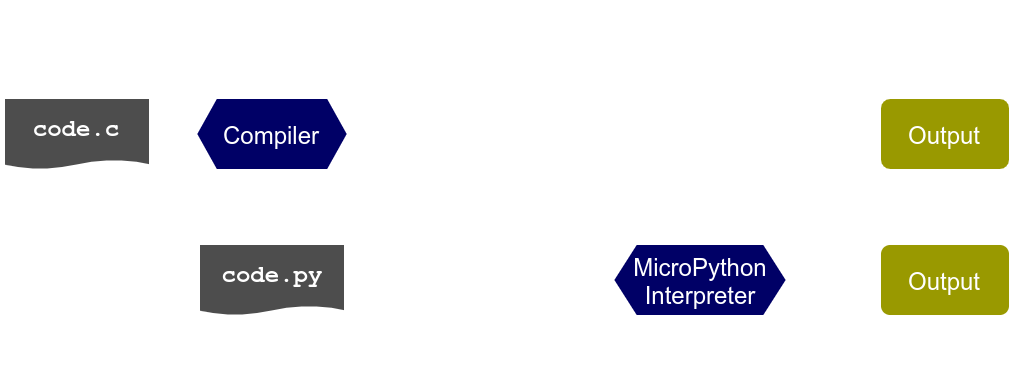
Compiler vs Interpreter
Hardware
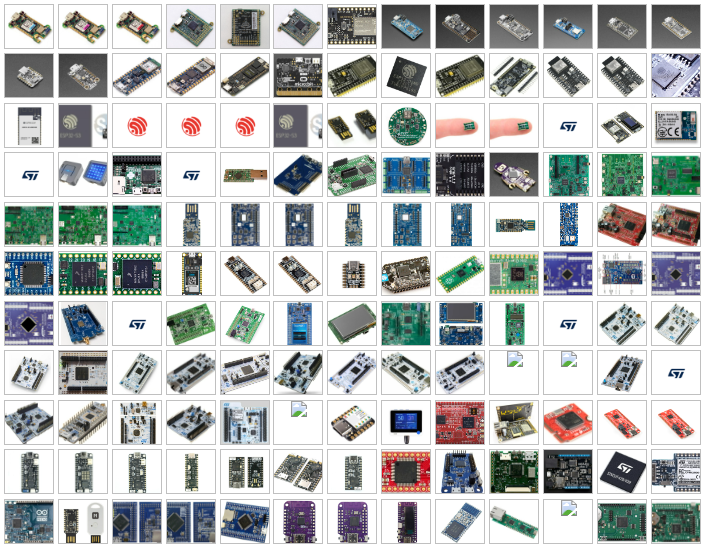
Supported Devices
This Presentation
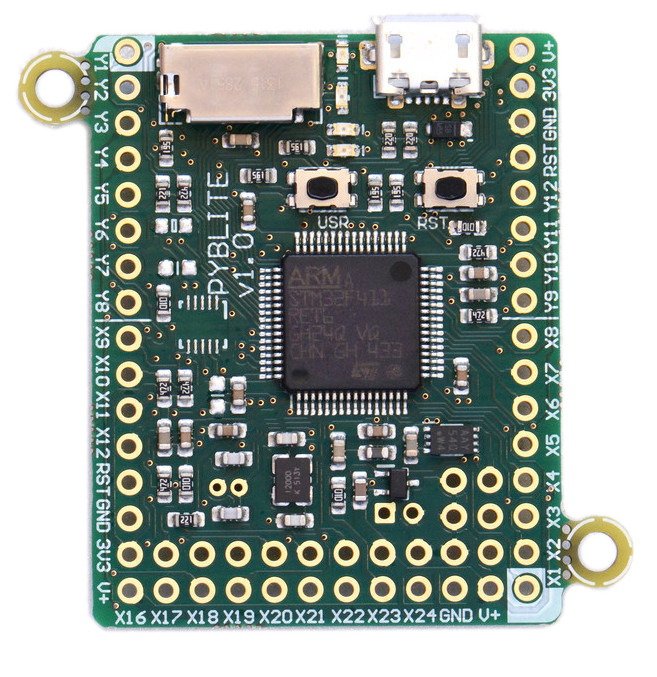
pyboard v1.1
For the rest of this presentation I'll be
using the pyboard v1.1.
Getting Started
Powering Up
- USB - also provides serial
- Power Supply - 3.5 to 10V
- Battery - 3.5 to 10V
Connect to REPL
Read Evaluate Print Loop (REPL)
                            $ cu -l /dev/ttyACM0
                            Connected.
                            MicroPython v1.9.2 on 2017-08-23; PYBv1.1 with STM32F405RG
                            Type "help()" for more information.
                            >>> import uos as os
                            >>> os.uname().version
                            'v1.9.2 on 2017-08-23'
for more detail: REPL tutorial
File System
Out of the Box
The pyboard's flash contains the following
                            flash/
                                README.txt
                                boot.py
                                main.py
                                pybcdc.inf
                            sd/
                                (sd card content)
Browse with Python
                            >>> import uos as os
                            >>> os.listdir('/')
                            ['flash', 'sd']
                            >>> os.getcwd()
                            '/flash'
                            >>> os.listdir('.')
                            ['main.py', 'pybcdc.inf', 'README.txt', 'boot.py']
Hot mount SD Card
The SD card can be mounted after boot.
                            >>> import uos as os, pyb
                            >>> os.umount('/sd')
                            >>> os.listdir('/')
                            ['flash']
                            >>> os.mount(pyb.SD, '/sd')
                            >>> os.listdir('/')
                            ['flash', 'sd']
Hot mount SD Card
RaisesOSError on failure...
                            import uos as os, pyb
                            try:
                                os.mount(pyb.SD, '/sd')
                                print("Successfully mounted SD card")
                            except OSError:
                                print("Failed to mount SD card")
Outputs
pyboard's LEDs
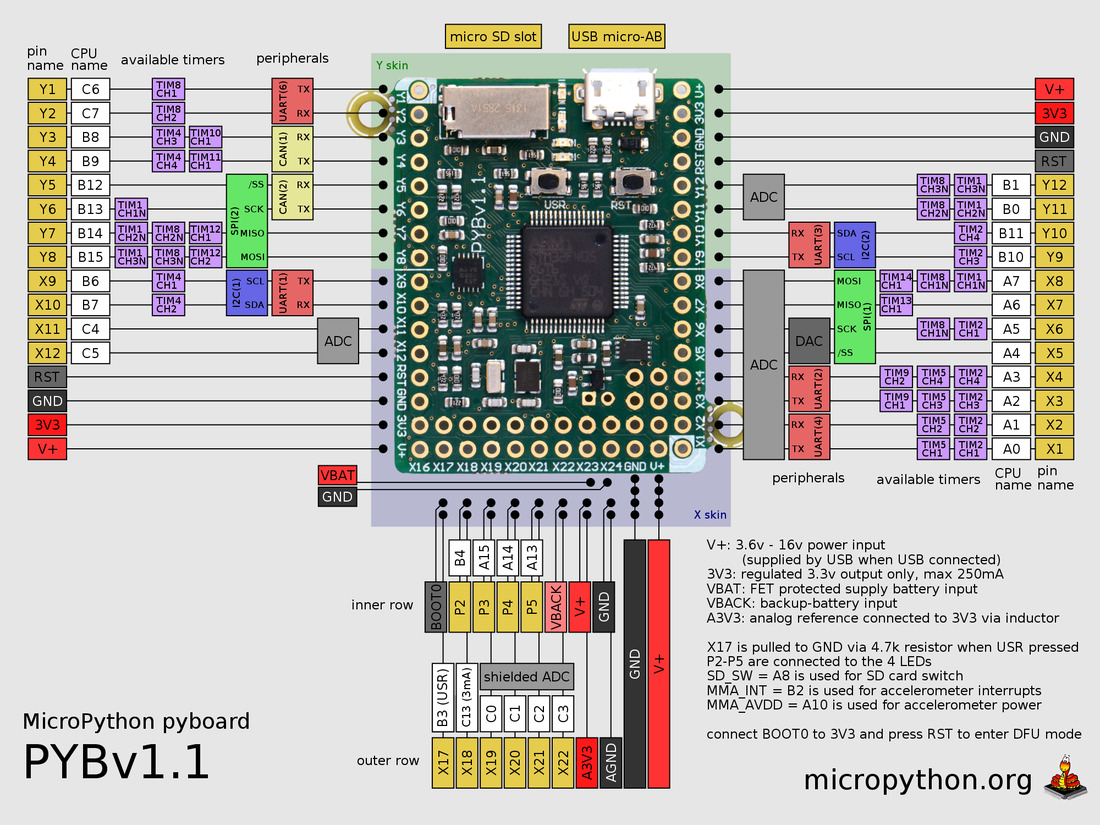
The pyboard has 4 LEDs onboard.| Colour | # | Pin | Pin Alias | PWM |
| red | 1 | A13 |
LED_RED |
|
| green | 2 | A14 |
LED_GREEN |
|
| yellow | 3 | A15 |
LED_YELLOW |
Yes |
| blue | 4 | B4 |
LED_BLUE |
Yes |
pyb.LED()
                            import pyb

                            red_led = pyb.LED(1)
                            yellow_led = pyb.LED(3)

                            # Basic controlls
                            red_led.on()
                            red_led.off()
                            red_led.toggle()

                            # Yellow and Blue have intensity control
                            yellow_led.intensity(0xff)  # same as on()
                            yellow_led.intensity(0x00)  # same as off()
Digital Outputs
Let's control the red LED directly.
                            import machine

                            # Both yield the same pin instance
                            pin = machine.Pin('A13', machine.Pin.OUT)
                            pin = machine.Pin('LED_RED', machine.Pin.OUT)
                            pin.names()  # ['A13', 'LED_RED']  shows alternatives

                            # Changing pin's state
                            pin.high()  # or: pin.on()
                            pin.low()  # or: pin.off()
                            print(pin.value())  # prints 0
                            pin.value(1 - pin.value())  # toggles pin
PWM Output
Let's control the blue LED's intensity directly.
                            import machine
                            import pyb

                            pin = machine.Pin('LED_BLUE')
                            timer = pyb.Timer(3, freq=1000)
                            channel = timer.channel(1, pyb.Timer.PWM, pin=pin)

                            # Change blue LED's intensity manually
                            channel.pulse_width_percent(5)
                            channel.pulse_width_percent(50)
                            channel.pulse_width_percent(100)
Analog Output
TODOInputs
pyb.Switch()
The pyboard has a switch marked USR on board.
                                    import pyb

                                    switch = pyb.Switch()

                                    switch.value()
                                    # True when pressed
                                    # False when not pressed
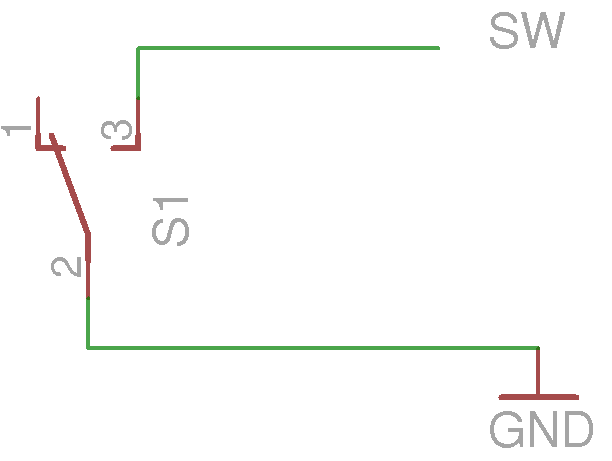
Digital Inputs
Check the same switch without usingpyb
                            import machine

                            # Pin connected to pyboard's Switch
                            pin = machine.Pin('SW')
                            pin.names()  # ['B3', 'X17', 'SW']  alternatives

                            # The switch connects the B3 pin to GND when pressed
                            pin.value()  # 0 when pressed
                                         # 1 when not pressed
Input Pull Up/Down
Inputs can be pulled up, down, or left to float.
                            import machine

                            pin = machine.Pin('SW', machine.Pin.IN, machine.Pin.PULL_UP)
                            pin = machine.Pin('SW', machine.Pin.IN, machine.Pin.PULL_DOWN)
                            pin = machine.Pin('SW', machine.Pin.IN, machine.Pin.PULL_NONE)

                            # These 2 initialize the pin in the same way
                            pin = machine.Pin('SW')  # defaults for SW are...
                            pin = machine.Pin('SW', machine.Pin.IN, machine.Pin.PULL_UP)
Analog Inputs
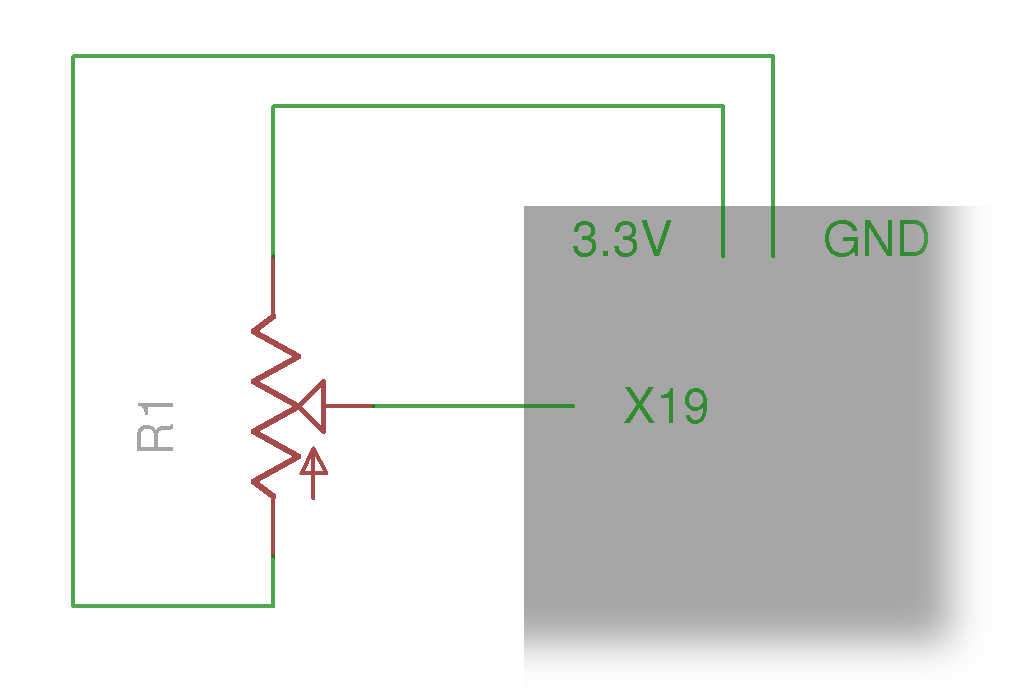
                                    import machine
                                    import utime as time
                                    import pyb

                                    pin = machine.Pin('X19')
                                    adc = pyb.ADC(pin)
                                    adc.read()  # reads value, 0-4095

                                    while True:
                                        time.sleep(0.1)
                                        value_ratio = adc.read() / 4095
                                        print('#' * int(40 * value_ratio))
Comms
Communicationprotocols
UART
                            from pyb import UART

                            uart = UART(1)
                            uart.init(baudrate=9600)

                            uart.write(b'abc')   # send 3 bytes
                            data = uart.read(3)  # receive 3 bytes

                            uart.deinit()
Virtual COM Port
- UART over USB
- No wiring necessary
- baudrate can be set much higher
than standard UART
                            from pyb import USB_VCP
                            vcp = USB_VCP()

                            vcp.write(b'abc')   # write 3 bytes
                            data = vcp.recv(3)  # receive 3 bytes
I²C
                            from pyb import I2C

                            i2c = I2C(1)                         # create on bus 1
                            i2c = I2C(1, I2C.MASTER)             # create as a master
                            i2c.init(I2C.MASTER, baudrate=20000) # init as a master
                            i2c.init(I2C.SLAVE, addr=0x42)       # init as a slave

                            i2c.send(b'abc')     # send 3 bytes
                            i2c.send(0x42)       # send a single byte
                            data = i2c.recv(3)   # receive 3 bytes

                            i2c.deinit()  # turn off the peripheral
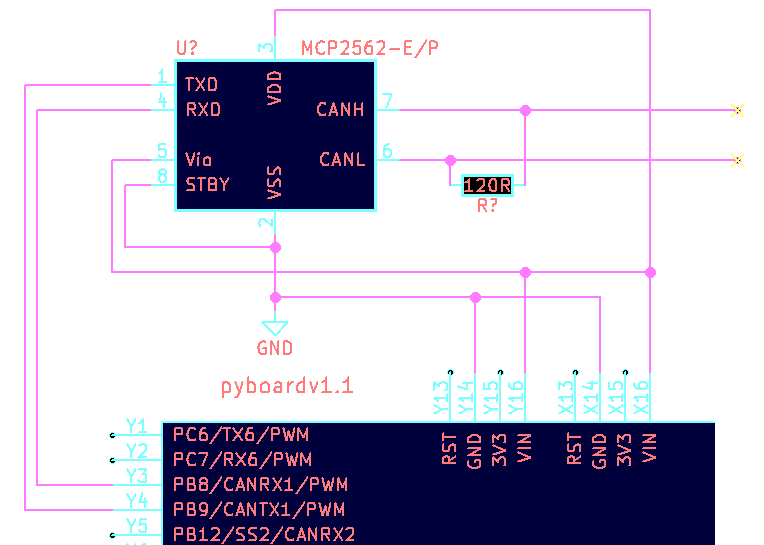
Controller Area Network (CAN)
- Used in all modern cars
- Excellent immunity to noise
- Large distances: 40m, even up to 1km
- pyboard has 2 CAN controllers
- Requires a tranceiver (probably:
MCP2562)
CAN: Wiring Diagram
CAN: Bit timing
1-bit
$prescaler = \frac{pclk1}{baud \times (1+bs1+bs2)}$
                            import pyb

                            baud = 250000  # baudrate to 25k
                            pclk1 = pyb.freq()[2]  # = 42000000
                            (bs1, bs2) = (5, 8)  # arbitrarily chosen
                            prescaler = int(pclk1 / (baud * (1 + bs1 + bs2)))
More on bit timing and frequencies
CAN: Transmit
                            import pyb

                            # Initialize CAN controller
                            can1 = pyb.CAN(
                                1, pyb.CAN.NORMAL, extframe=False,
                                # timing values from previous slide
                                prescaler=prescaler, bs1=bs1, bs2=bs2,
                            )

                            # Transmit
                            can1.send(b'abc', 0x100)
CAN: Receive
                            # Set explicit ID filter for IDs 0x100 - 0x103
                            can1.setfilter(
                                0, pyb.CAN.LIST16, 0, (0x100, 0x101 0x102, 0x103)
                            )

                            msg = can1.recv(0)
                            (msg_id, rtr, filter_index, data) = msg
Interrupts
External Interrupt
                            import pyb
                            import machine

                            def callback(i):
                                print("intr")

                            pin = machine.Pin(
                                'SW', machine.Pin.IN, machine.Pin.PULL_UP
                            )
                            ext = pyb.ExtInt(
                                pin,
                                pyb.ExtInt.IRQ_FALLING,
                                machine.Pin.PULL_UP,
                                callback
                            )
Timer Interrupt
                            import machine
                            import pyb

                            led = machine.Pin('LED_RED')
                            def toggle_led_cb(tim):
                                led.value(1 - led.value())

                            timer = pyb.Timer(1, freq=1000)
                            timer.counter() # get counter value
                            timer.freq(2) # 2 Hz
                            timer.callback(toggle_led_cb)
Memory Limitation
Interrupt code is run while the heap is locked;
no memory can be allocated, or de-allocated.
list.appendorset.addlist.poporset.remove- function
return - add a key to a
dict - and more
Scheduling
To work around interrupt limits.
                            import micropython, machine

                            switch = machine.Pin('SW')
                            timer = pyb.Timer(1, freq=2)

                            window = []
                            def populate_window(t):
                                global window
                                window = window[-9:] + [switch.value() == 0]

                            timer.callback(populate_window)  # BAD! raises MemoryError

                            def timer_callback(t):
                                micropython.schedule(populate_window, t)
                            timer.callback(timer_callback)
Your Script
Boot Order
- SD Card -
/sd/main.py - Flash -
/flash/main.py
Both can be copied to via USB Mass Storage.
The red LED will illuminate while
the device is busy.
Programs on SD cards alows a sort of nostalgic cartridge system.
Import Path
Defaults are...
                            >>> import usys as sys
                            >>> sys.path
                            ['', '/sd', '/sd/lib', '/flash', '/flash/lib']
Installing from PyPI
- Download
.tar.gzfile - Extract to one of the
libfolders
For Example...
Installingitertools.
- Download
itertoolsfrom PyPI - Extract to
libon the sd card - result should look like:
examples/itertools-installed
Debugging
+ Bug
Let's run a main.py with a bug.
                            import pyb

                            led = pyb.LED(1)  # Red LED
                            sw = pyb.Switch()

                            while True:
                                time.sleep(0.05)
                                if sw.value():
                                    led.on()
                                else:
                                    led.off()
You want a hint? I don't have time.
Use a REPL
Read output fromMicroPython interpreter.
- connect the board to a
REPL - soft reset the board with
Ctrl+D - read the output
The Result
Ctrl+D is pressed...
                            >>>
                            PYB: sync filesystems
                            PYB: soft reboot
                            Traceback (most recent call last):
                              File "main.py", line 7, in <module>
                            NameError: name 'time' is not defined
                            MicroPython v1.9.2 on 2017-08-23; PYBv1.1 with STM32F405RG
                            Type "help()" for more information.
                            >>>
time is on line 7.
Debugging Interrupts
To enable standard exception reporting to a REPL
                            import micropython
                            micropython.alloc_emergency_exception_buf(100)
alloc_emergency_exception_buf
documentation for details.
Debugging with pdb?
Not yet, sadly.
Watch this space , and #3009 .
Asyncio
Multitasking
For example...
- Toggle red LED every 1000 ms
- Toggle green LED every 450 ms
The confusing way
Without usingasyncio
                            import utime as time
                            from machine import Pin

                            led1, t1 = Pin('LED_RED', Pin.OUT), time.ticks_ms()
                            led2, t2 = Pin('LED_GREEN', Pin.OUT), time.ticks_ms()
                            while True:
                                if time.ticks_diff(time.ticks_ms(), t1) >= 1000:
                                    t1 = time.ticks_ms()
                                    led1.value(1 - led1.value())
                                if time.ticks_diff(time.ticks_ms(), t2) >= 450:
                                    t2 = time.ticks_ms()
                                    led2.value(1 - led2.value())
                                time.sleep_ms(10)
The asynchronous way
                            import uasyncio as asyncio
                            from machine import Pin

                            async def blink(led, period):
                                """Toggle LED once each period"""
                                while True:
                                    await asyncio.sleep_ms(period)
                                    led.value(1 - led.value())

                            # Create loop, add tasks, and run
                            loop = asyncio.get_event_loop()
                            loop.create_task(blink(Pin('LED_RED', Pin.OUT), 1000))
                            loop.create_task(blink(Pin('LED_GREEN', Pin.OUT), 450))
                            loop.run_forever()
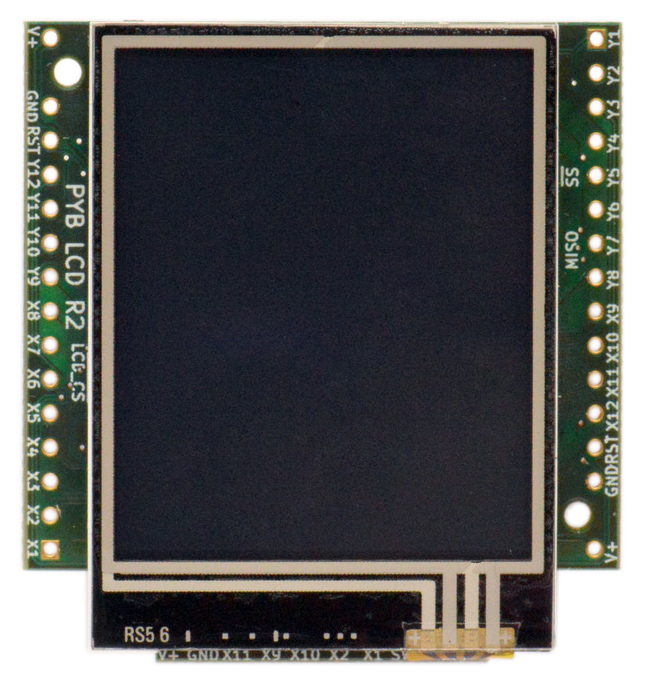
LCD Interface
LCD160CRv1.0

- Resolution: 160 x 128
- Colour: 16-bit (565)
- Screen refresh: 30fps
- Resistive Touch
- store + references
- demo video
Wiring
pyboard Right >> LCD Left
Run Test
Thelcd160cr & lcd160cr_test
modules are included with pyboard's MicroPython build.
                            import lcd160cr
                            import lcd160cr_test

                            # Create LCD object
                            lcd = lcd160cr.LCD160CR('XY')

                            # Run built-in test on lcd
                            lcd160cr_test.test_features(lcd)
                            lcd160cr_test.test_mandel(lcd)
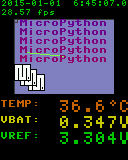
Tests results

Lines
                                    import lcd160cr
                                    lcd = lcd160cr.LCD160CR('XY')

                                    # white on black
                                    lcd.set_pen(0xffff, 0)
                                    lcd.erase()  # clear screen

                                    # Draw a line
                                    lcd.line(0, 0, lcd.w, lcd.h)

Poly Lines
                                    from math import sin, cos, pi
                                    x = int(lcd.w / 2)
                                    y = int(lcd.h / 2)

                                    points = []
                                    for i in range(6):
                                        a = i * (0.8 * pi)
                                        points += [
                                            x + int(60 * sin(a)),
                                            y + int(60 * cos(a))
                                        ]

                                    lcd.poly_line(
                                        bytearray(points)
                                    )

Boxes
                                    # Set some colours
                                    BLUE = lcd.rgb(0, 0, 255)
                                    YELLOW = lcd.rgb(255, 255, 0)
                                    GREY_20 = lcd.rgb(51, 51, 51)

                                    lcd.set_pen(0, GREY_20)
                                    lcd.erase()

                                    lcd.set_pen(BLUE, YELLOW)
                                    lcd.rect(10, 10, 100, 70)

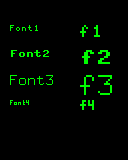
Text
                                    # Set some colours
                                    WHITE = lcd.rgb(255, 255, 255)
                                    GREEN = lcd.rgb(0, 255, 0)
                                    lcd.set_pen(WHITE, 0)
                                    lcd.set_text_color(GREEN, 0)

                                    for i in [1, 2, 3, 4]:
                                        # normal
                                        lcd.set_pos(10, i * 25)
                                        lcd.set_font(i, scale=0)
                                        lcd.write('Font%i' % i)
                                        # scaled up by 1
                                        lcd.set_pos(80, i * 25)
                                        lcd.set_font(i, scale=1)
                                        lcd.write('f%i' % i)
JPG
Pre-process jpg:
                                    sudo apt install libjpeg-progs
                                    jpegtran orig.jpg > photo.jpg
pyboard code:
                                    fname = '/sd/images/photo.jpg'
                                    with open(fname, 'rb') as f:
                                        buf = bytearray(f.read())
                                    lcd.set_pos(0, 0)
                                    lcd.jpeg(buf)

Resistive Touch
                            (touching, x, y) = lcd.get_touch()

                            # touching: is True or False
                            # x: int coord of most recent touch
                            # y: int coord of most recent touch
And More
- Frame buffering
- Window scrolling
- Portrait / Landscape coordinates
- Backlight brightness
- Save settings to flash
Documentation here.